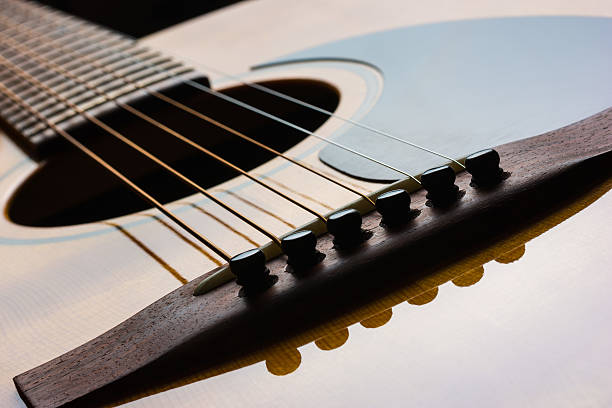
Bridge In A Banjo
It is very important to place the bridge in a Banjo appropriately so that the best sound is emitted. Despite saying that, it is also true, placing the bridge perfectly without proper guidance is a little difficult. So, in this article how do you attach a bridge to a Banjo? learn the art of doing it very easily. But before that also know a few things about the bridge too.
Meaning Of A Bridge In A Banjo
The bridge is the connector between the pot assembly of a Banjo with the neck with strings. Since the bridge plays a vital role in the tension of the strings so it is very important to be made with high-quality wood. In a traditionally made bridge, you will find maple or ebony wood has been used because they are good conductors of sound.
Functions Of A Bridge
The bridge helps in altering the volume and tone in the Banjo. So, as the general rule goes if the bridge is low, it will bring low volume, and if high then a high volume. But it must also be remembered the height of the bridge has no role to play in its sound quality.
Shape Of A Bridge
If you modify the shape of a bridge, it shall leave an effect on the sound quality of the Banjo. If you place a thin bridge in a standing position it will lead to less contact with the head. The tone shall be bright.
Attaching A Bridge To A Banjo
- Put the banjo over a flat surface while laying the bridge over its head. Remember to keep the logo on the Banjo downwards.
- Place the bridge in a horizontal position underneath the strings. Put it halfway toward the head.
- Now, near the tailpiece lift the strings a little upward and gently raise the bridge to an upright position. Gently leave the strings and make sure that the bridge remains in its position.
- Move each string very gently back to its slot over the bridge.
- Keep sliding the bridge closer to the tailpiece until it covers two-thirds area towards the head of the Banjo. once done, it shall be ready for intonation.
- Put your finger on the 12th fret of the first string pluck and remove the finger to listen to the harmonic tone.
- Again put the finger on the 12th fret of the first string and after you pluck it keeps holding the string. Ensure that the sound it emits is the same as the previous time. If the sound is sharp or flat adjust the bridge either a bit forward or backward until the sound is balanced as the first time.
- Continue this process for the remaining strings. Always make a small marking with a pencil at the position of the bridge after it is adjusted. It shall make the job easier to perform next time you adjust the bridge.

I own a music instruments shop. My go to instrument is a banjo. My business makes it easier for me to access the instruments from various brands and of various types. I will give my honest opinion here to help out others in choosing the right instrument for them.